Shed Some Light On The Subject, Won't You?
Riddle me this, Batman. How do you upgrade your half bath light fixture without actually forking over the cash to replace the entire unit? Well, I’m no Batman; but here are a couple of quick and easy tasks we did to breathe new life into ours to avoid replacement.

This is sort of a Phase 1 fix until we can save our pennies for something different. Plus, I just haven’t found one that knocks my socks off. Well, at least not one at a reasonable price.
And of course finding an amazing fixture has been extra tricky because you’ll notice in this before picture that the base portion of the light is rather large and chunky. (Please excuse the awful iPhone pics.)
So here we are left with two choices for a replacement – either find another one with an equally as large and chunky base to avoid having to paint (and potentially patch) under there, or go with a sleeker looking design and bust out the spackle and paint brush. As much as I’d love to avoid another spackle/paint job, I know when we make that leap we'll go the sleeker design route. Woe is me. But until then, here’s our interim solution:
Step 1: Remove the light bulbs and light covers, turn off the electrical breaker, and then carefully remove the fixture.
Step 2: Tape off the inside of each light socket to ensure paint doesn't enter and ruin the electrical components. I took a piece of folded paper towel and stuck it into the socket and then Eric brought it home by using painter’s tape to cover it all up.
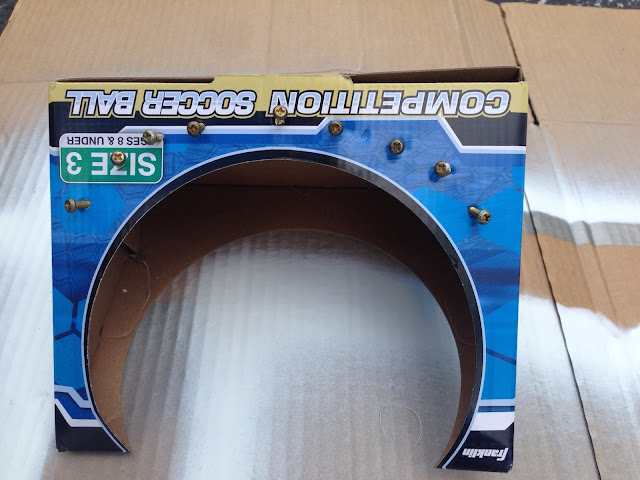
Step 3: Grab some old cardboard, spray paint, the light fixture, and the screws that hold the light covers in place, and head outside. Since you need the bulk of the screws to be exposed enough to get paint on them, I raided our recycle bin and found the box the boys’ new soccer ball came in. It worked perfectly. Any box should work, though. I just gently pushed each screw through just enough so each one would stand up on its own and not topple over.

Step 4: Spray! We went with Rust-Oleum’s Ultra Cover Paint + Primer in semi-gloss white. I initially wanted to do something bold like a fun blue or green, but couldn’t make up my mind, so we went simple white for now. As for the spraying, I like to follow the general rule of thumb (as suggested on the can) and do multiple light coats to avoid drips. You can do multiple coats within minutes of one another, too, which is awesome. I think I ended up doing about three coats to make sure I had even coverage throughout. Assuming normal humidity outside, it’s usually dry to the touch in 20 minutes, ready to be “handled” in 60 minutes, and then fully cured and ready for reassembly after 24 hours.
Step 5: The next afternoon (after our 24 hr waiting period) we reattached it to the wall in the half bath. I was starting to get a bit giddy at this point since I really liked what I was seeing. I was able to score some new-to-us light covers on a recent trip to the Habitat for Humanity’s Restore shop as well.
Each one was originally marked $1 and then it happened to be 50% off lighting materials that day. Now that’s what I’m talking about! That meant for $1.50 I scored three better looking covers. Granted, they aren’t the most beautiful covers known to man, but they’re an interim fix and they definitely rank higher in the looks department than our current frosted and etched ones. So up went the light covers and light bulbs and boom. Mission completed.


This project was amazingly quick and extra nice since we knew it was so low risk. The cost of the spray paint and light covers were so minimal. And since we knew we didn’t love the brass, we knew no matter what we’d end up in a better position in the end. It was just a matter of how much better. So far I’m pretty pleased with the end result. It’ll definitely tide us over until we can find that ever elusive helluva buy that we can’t pass up. She's coming along. The bright white vanity, light, and mirror definitely remind us how bisque the counter and toilet are, but those will have to wait until another day.
Total Project Cost: $6.50
Painter’s tape: $0 (already had this on hand)
New light covers: $1.50
Spray paint: $5
Here’s our current standing with our to-list for this room:
Paint wallsReplace mirrorRemove current towel bar and install new towel ring New toilet paper holderInstall artworkPaint vanity Install new vanity hardware- New vanity top
- New faucet
- New toilet (current one is bisque and doesn’t match great)
Do something with light figure; replace or update somehow - Paint interior of door white
- Paint baseboard trim white
- Paint porthole (both sides) white
- Add crown molding
Paint vent cover and re-install
Anne


No comments:
Post a Comment